
package-manager-ui.md 30 KB
Unity Package Manager
A package is a container that holds any combination of assets, Shaders, Textures, plug-ins, icons, and scripts that enhance various parts of your project, including Unity modules (such as Physics or Animation). Unity packages are newer, more tightly integrated versions of Asset Store packages, able to deliver a wide range of enhancements to Unity.
Use the Unity Package Manager (in Unity’s top menu: Window > Package Manager) to view which packages are available for installation or already installed in your project. In addition, you can use this window to see which versions are available, and install, remove, disable, or update packages for each project.
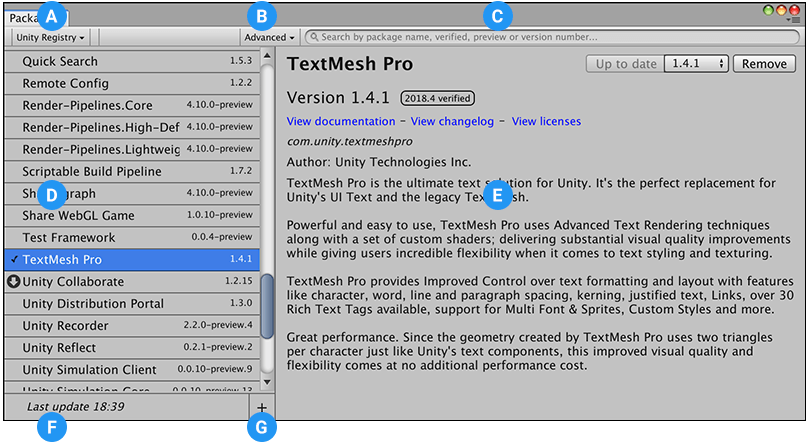
The Packages window displays:
- (A) The package scope drop-down menu, which allows you to filter which packages appear in the list.
- (B) The Advanced button, which allows you to display preview packages in addition to packages that have been verified to work with Unity.
- (C) The search box, which allows you to look for packages by name.
- (D) The packages list view, which displays all packages that match the filter and search parameters you specify.
- (E) The package-specific detail view, which displays information specific to the package selected in the list.
- (F) The status bar, which displays messages about the package load status and warnings about the network.
- (G) The Add package from disk button, which allows you to specify the location of an external package.
Finding packages
The Packages window displays the following types of Unity packages:
- Read-only packages
These are packages which the Package Manager downloads from the Unity package registry as needed. They are not bundled with the project source, and might have dependencies on other packages in external projects. This type is typical of most Unity packages.
The Package Manager can also download packages from other registries. For more information, see scoped package registries.
- Local packages
These are packages that you have saved on your computer in an external location, outside of your current Unity project.
- Built-in packages
These represent some of the core Unity features. You can use these packages to turn Unity modules on and off.
Note: You can find out more about what each module implements in the Unity Scripting API. Each module assembly page lists which APIs the built-in package implements.
By default, the Packages window displays the list of all packages either registered in the Unity package registry or installed locally.
The following icons show you package status:
| Icon: | Description: |
|---|---|
 |
A check mark indicates that the package is already installed or enabled. |
 |
The download icon indicates that the installed packages has an available update. |
 |
An error icon indicates that something went wrong during installation or loading. For more advice on resolving errors, see Error messages below. |
You can filter the list to display only packages installed in your project (including local packages), or display only built-in Unity packages. You can also search for a specific package by package name, tag, or package version number.
Filtering the list
To change which packages appear in the list, select the scope you want from the drop-down menu in the left-hand corner of the Packages window.

You can select from these options:
- The Unity Registry scope (the default) displays all packages on the Unity package registry, regardless of whether they are already installed in your project. This scope does not display local, tarball, or embedded packages.
- The My Registries scope displays all packages on any scoped package registries set up in your project, regardless of whether the packages are already installed.
- The In Project scope displays all packages currently installed in your project, including local packages.
- The Built-in packages scope displays only built-in Unity packages.
When you select a new scope, your choice appears on the package scope drop-down menu and the list displays the packages matching your choice.

Note: If you entered any text in the search box, the list only displays packages which match both the scope and the search criteria.
Advanced button
The Advanced button opens a drop-down menu that allows you to show preview packages. Preview packages are not verified to work with Unity and might be unstable. They are not supported in production environments.
To show the preview packages that are available, click the Advanced button, then click the Show preview packages menu item.
Searching for packages
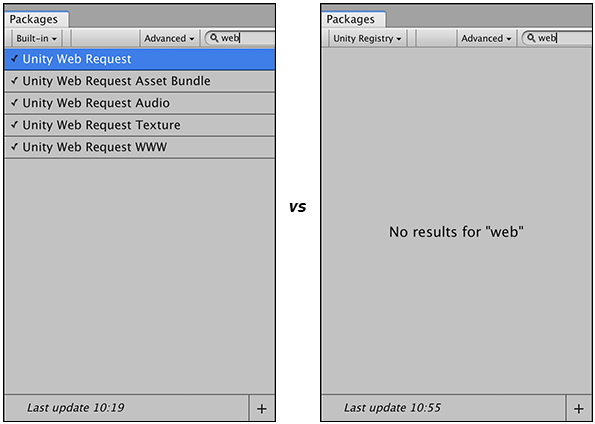
You can use the search box at the top of the Packages window to find any packages that match the text you enter. The Package Manager updates the package list as you enter text, displaying every package within the current scope that matches. For example, if you enter web in the search box, the list displays different results depending on whether you chose the Built-in packages scope or the Unity Registry scope:
You can search for a package by its package name, its tag name, or its package version number. The Package Manager analyzes the text that you enter to detect which method you are using, and updates the list of packages dynamically.
Package name
You can search for either the display name as it appears in the Packages window, or the registered package name that begins with com.unity.
Your search text can match the beginning, middle, or end of the package's name.
Tag name
To search by tag name, enter one of the package version tags. For example, if you enter verified in the search box, only packages with a verified tag appear, regardless of their package name.
Version number
Enter the version number in version order (MAJOR.MINOR.PATCH). For example, typing 1 returns all packages with versions matching 1.x.x (for example, 1.0.0, 1.3.2, and 1.10.1 all match but not 0.1.0).
Status bar
The Package Manager displays messages in the status bar at the bottom left of the Packages window.
There are typically three status messages that you might see. The Loading packages message appears briefly the first time you open Packman UI in a new project. However, if the Package Manager detects a problem, such as a missing network connection, the Package Manager displays a warning in the status bar:

You will also often see a message informing you when the last update occurred:

Viewing package details
The pane on the right side of the Packages window displays details about the selected package.
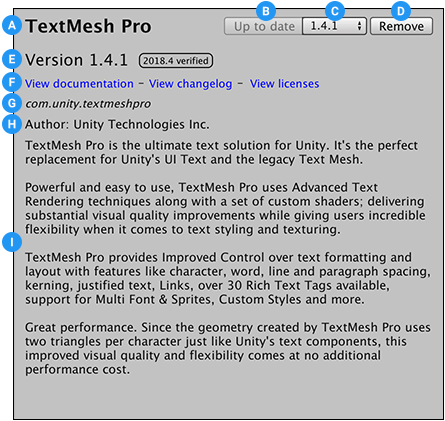
These details include the following information:
- (A) The display name
- (B) Buttons to install or update a package (or the Up to date message if the selected version is already installed)
- (C) The package version drop-down menu
- (D) Buttons to remove or disable the package
- (E) The version number (and tag, if available)
- (F) The links to open the package documentation page, the package change log (if available), and the license information.
- (G) The official package name from the registry. For Unity packages, names start with
com.unity.; for packages on scoped registries, names start withcom.and the company or domain name. - (H) The author. For packages on scoped registries, the author name also appears as the group name for the My Registries scope.
- (I) A brief description
List of versions
You can view the list of versions available for the current package by clicking the version drop-down menu beside the Update to or Install button in the upper right of the Package specific detail view.
- (A) The main menu displays the current version, the latest version (even if it is a preview), and the verified version.
- (B) The submenu displays all available versions.
You can select any of these versions for the current package and install that specific version using the Install or Update to button.
Version tags
Some packages display tags next to the version number. These tags convey information about that version of the package.
The Package Manager uses the following values:
| Tag: | Meaning: | |--|--| | verified | Verified packages are packages that have undergone testing and have been verified to work safely with a specific version of Unity, and all other packages verified for that version. Packages that have been verified to work with this version of Unity display the 2018.4 verified indicator beside them in the Package Manager window. | | preview | Preview packages are packages that are not production-ready and you should only use them for testing and to provide feedback. At some point in the future, they might pass the verification requirements; however, they might also be deprecated instead. Because there is no guarantee for future support, you should not use any package that appears with the preview indicator. | | local | This package is located on your local disk, but is external to your Unity project folder. | | (no tag) | Any package that appears in this list without either the 2018.4 verified indicator or the preview indicator is safe to use in this version of Unity and has been validated, but is not officially verified for this version. |
Finding more information
To find out more about a package, you can view its documentation, changelog, or license information.
To access any of these pages, click the View documentation, View changelog, or View licences links.
The package page opens in your default browser.

To switch back and forth between the User Manual documentation, the Scripting API documentation, the Changelog, and the License information for this package, click the corresponding link at the top of the page.
Installing, removing, disabling, and updating packages
You can perform a variety of tasks through the Packages window:
- Install a new package
- Remove an installed package
- Disable a built-in package
- Update an installed package
- Specify an external package location
Accessing the Packages window
To open the Packages window, navigate to Unity's main menu and go to Window > Package Manager.
Installing a new package
To install a new package:
- Open the Packages window and, from the package scope drop-down menu, select either Unity Registry or My Registries.
- Select the package you want to install from the list of packages. The package information appears in the details pane.
- Select the version you want from the version drop-down menu.
- Click the Install button. When the progress bar finishes, the new package is ready to use.
Removing an installed package
You can only remove packages which are not required by another package.
When you remove a package, any Editor or run-time functionality which it implemented is no longer available.
To remove an installed package:
- Open the Packages window and select In Project (or one of the registry scopes) from the package scope drop-down menu.
- Select the package you want to remove from the list of packages. The package information appears in the details pane.
- Click the Remove button. When the progress bar finishes, the package disappears from the list.
You can restore a removed package from the list when you are in one of the registry scopes.
Disabling a built-in package
You can disable a built-in package if you don't need some modules and you want to save resources. However, when you disable a built-in package, the corresponding Unity functionality is no longer available. This results in the following:
- If you use a Scripting API implemented by a disabled package, you get compiler errors.
- Components implemented by the disabled built-in package are also disabled, which means you cannot add them to any GameObjects. If you have a GameObject that already has one of these components, Unity ignores them in Play mode. You can see them in the Inspector window but they are greyed out to indicate that they are not available.
- When building a game, Unity strips all disabled components. For build targets which support engine code stripping (like WebGL, iOS, and Android), Unity doesn't add any code from a disabled built-in package.
To disable a built-in package:
- Open the Packages window and select Built-in packages from the package scope drop-down menu.
- Select the package you want to remove from the list of packages. Its information appears in the Details pane.
- Click the Disable button. When the progress bar finishes, the check mark no longer appears next to the built-in package and the Disable button becomes an Enable button.
To re-enable a disabled built-in package, click the Enable button.
Updating an installed package
You can update a package while in the In Project scope, the Unity Registry scope, or the My Registries scope:
- Open the Packages window. An arrow indicator appears next to any packages that have updates available.
- Select the package you want to update from the list of packages. The package information appears in the details pane.
- Select the version you want from the version drop-down menu.
- Click the Update to button.
When the progress bar finishes, the new package version information appears in the Details pane, and any new functionality is immediately available.
Specifying a local package location
The Package Manager can load a package from anywhere on your computer, even if you saved it outside your Unity project folder.
To load a package from your local disk:
- Click the plus (
+) icon in the status bar.
The Add package from disk button appears.

- Click the Add package from disk button to bring up a file browser.
- Navigate to the folder root of your local package.
- Double-click the
package.jsonfile in the file browser.
The file browser closes and the package now appears in the package list with the local tag.
Error messages
The Package Manager displays error indicators when it encounters problems:
- System-wide issues
Error messages that appear in the status bar indicate the Package Manager has detected an issue that is not related to a specific package. For example, if the Package Manager cannot access the package registry server, it displays this message in the status bar:
If your network cannot reach the package registry server, it is probably because there is a connection problem with the network. When you or your system administrator fix the network error, the status bar clears.
- Package-specific issues
If a specific package has a problem when loading or installing, the error icon () appears in the package list next to the compromised package. To find out what the problem is, open the compromised package's details pane.
Understanding how packages work
In addition to its contents (assets, Shaders, Textures, plug-ins, icons, and scripts), a Unity package contains a package manifest file. The package manifest tells Unity how to display its information page in the Packages window, and how to install the package in the project.
It also contains several files that help manage package deployment, including the tests, samples, license, changelog, and documentation.
Manifests
There are two types of manifest files: project manifests (manifest.json), and package manifests (package.json). Both files use JSON (JavaScript Object Notation) syntax to communicate with the Package Manager, by describing which packages are available for each project, and what each package contains.
Project manifests
Project manifests (manifest.json) tell the Package Manager which packages and versions are available to the project.
Project manifests support the following value:
| Key: | JSON Type: | Description: |
|--|--|--|
| dependencies | Object |List of packages for the Package Manager to load. These are usually packages officially registered with Unity, but may also include local packages that are external to your Unity project. |
| registry | String | URL of the main Unity Package Manager registry. This overrides the default registry URL (https://packages.unity.com).
Note: If you override the default registry with your own registry, you lose access to the official Unity packages. Instead, if you want to augment the Unity package library with your own private collection of packages, set the scopedRegistries attribute to use a scoped registry. |
| scopedRegistries | Array of Objects | Specify custom registries in addition to the default registry. This allows you to host your own packages.
See the Scoped registries section for more details. |
Example of a manifest.json file:
{
	"dependencies": {
		"com.unity.package-1": "1.0.0",
		"com.unity.package-2": "2.0.0",
		"com.unity.package-3": "3.0.0",
		"com.unity.my-local-package": "file:/<external_path>/com.unity.my-local-package"
	}
}
Unity stores each project manifest in the [your_project_root_folder]/Packages/manifest.json file.
Package manifests
The Package Manager uses package manifests (package.json) to determine which version of the package to load, and what information to display in the Packages window.
Package manifests support the following values:
| Key: | JSON Type: | Description: |
|--|--|--|
| name | String |The officially registered package name, following this naming convention: "com.unity.[package name]". For example, "com.unity.resourcemanager" |
| displayName | String |The package name as it appears in the Packages window. For example, "Resource Manager" |
| version | String |The package version "MAJOR.MINOR.PATCH". Unity packages follow the Semantic Versioning system. For example, "1.3.0". |
| unity | String |The Unity version that supports this package. For example, "2018.1" indicates compatibility starting with Unity version 2018.1. |
| description | String |A brief description of the package. This is the text that appears on the Details pane of the Packages window. Some special formatting character codes are supported, such as line breaks (\n) and bullets (\u25AA). |
| category | String |The category this packages is in. For example, "Forces". |
| dependencies | Object |A list of packages that this package depends on, expressed as a JSON dictionary where the key is the package name and the value is the version number. Unity downloads all dependencies and loads them into the project alongside this package. |
Example of a package.json file:
{
	"name": "com.unity.package-4",
	"displayName": "Package Number 4",
	"version": "2.5.1",
	"unity": "2018.2",
	"description": "This package provides X, Y, and Z. \n\nTo find out more, click the \"View documentation\" link.",
	"keywords": ["key X", "key Y", "key Z"],
	"category": "Controllers",
	"dependencies": {
		"com.unity.package-1": "1.0.0",
		"com.unity.package-2": "2.0.0",
		"com.unity.package-3": "3.0.0"
	}
}
Unity stores each package manifest in the [package_root_folder]/package.json file.
Unity's Package registry
Unity maintains a central registry of official packages that are available for distribution. When Unity loads, the Package Manager communicates with the registry, checks the project manifest file, and displays the status of each available package in the Packages window.
When you remove a package from the project, the Package Manager updates the project manifest to exclude that package from the list when in In Project scope, but it is still available in either Unity Registry or My Registries scope because it is still in the registry.
When you install or update a package, the Package Manager downloads the package from the registry.
Scoped package registries
A scoped registry allows you to use a different registry in addition to the Unity default registry where you can host your own packages. Using scoped registries ensures that the Package Manager always maps a package to one and only one registry, guaranteeing a consistent result regardless of network conditions.
For example, if you set up your own server where you are hosting some of the Unity packages, you could end up getting the package from the wrong registry if one registry is temporarily unavailable, even if the Package Manager always searches the registries in the same order. However, if you set up a scoped registry for your own server, the package always maps to one and only one registry, guaranteeing a consistent result regardless of network conditions.
Supported registry types
Unity Package Manager supports registries based on the npm protocol. You can use any off the shelf npm registry server and it should work; Verdaccio is quick to set up and doesn't require a lot of configuration.
Once you set up these servers, you can include them as scoped registries, which is the same concept that npm uses.
Limitations
Some npm registry servers do not support searching all packages with the /all Web API route. The Package Manager Search API relies on configured scoped registries to support this old npm API protocol. It has an HTTP endpoint that returns the metadata of all published packages (for example, https://registry.my-company.com/-/all).
If you have a tool that uses the Package Manager API to list available packages, you might experience unexpected results if your registry does not support the old protocol. For example, the Package Manager window does not display packages from those scoped registries in the My Registries tab. However, this limitation does not apply to package resolution, so you can still manually add packages from scoped registries to the project manifest.
Setting up a scoped registry
To set up your scoped registries in your project manifest, use the scopedRegistries attribute, which takes an array of scoped registry configuration objects. Each object contains a name, a url location, and a list of scopes for each package name pattern you want to map to that scoped registry. When the Package Manager decides which registry to fetch a package from, it compares the package name to the scopes values and finds the registry whose scopes most closely match.
For example, in the project manifest below, there are two scoped registries, Main and Tools:
{
  "scopedRegistries": [
    {
      "name": "Main",
      "url": "https://my.company.com/registry",
      "scopes": [
        "com.my-company", "com.my-company.tools.foo"
      ]
    },
    {
      "name": "Tools",
      "url": "https://my.company.com/tools-registry",
      "scopes": [
        "com.my-company.tools"
      ]
    }
  ],
  "dependencies": {
    "com.unity.cinemachine": "1.0.0",
    "com.unity.2d.common": "1.0.0",
    "com.unity.2d.animation": "1.0.0",
    "com.my-company.bar": "1.0.0"
  }
}
When a user requests the com.my-company.bar package, the Package Manager finds that the com.my-company.* namespace is the closest match to its name, and therefore fetches the package from the Main registry.
When a user requests the com.my-company.tools.foo package, the Main registry has a scope with a namespace that's an exact match.
When a user requests the com.my-company.tools.animation package, the Package Manager finds that the com.my-company.tools.* namespace is the closest match to its name and therefore fetches the package from the Tools registry. Even though it also matches the Main scope, the com.my-company.* namespace is not as close a match.
When a user requests the com.other-company.bar package, the Package Manager doesn't find a match in any of the scoped registries, and therefore fetches the package from the default registry.
Configuration
Configure scoped registries with the scopedRegistries attribute in the project manifest. The scopedRegistries attribute contains an array of entries (objects) that represent all of the registries.
Each registry object contains a unique name, a location (url), and an array of namespaces, or scopes. The Package Manager uses the scopes to match package names to registries.
| Attribute | JSON Type | Description |
|---|---|---|
| name | String | The scope name as it appears in the user interface. The Package Manager window displays this name in the package details view. For example, "name": "Tools". |
| url | String | The URL to the npm-compatible registry. For example, "url": "https://my.company.com/tools-registry" |
| scopes | Array of Strings | Array of scopes that you can map to a package name, either as an exact match on the package name, or as a namespace. For example, "scopes": [ "com.my-company", "com.my-company.tools.foo" ] Note: This type of configuration assumes that packages follow the Reverse domain name notation. This ensures that com.unity is equivalent to com.unity.*. |
Technical details
Requirements
This version of Unity Package Manager is compatible with the following versions of the Unity Editor:
- 2018.3 and later (recommended)
Documentation revision history
| Date | Reason |
|---|---|
| May 22, 2020 | Documentation updated. Added scoped registries section and updated the filter scope information. |
| October 3, 2018 | Documentation updated. Image updates and minor corrections. |
| September 14, 2018 | Documentation updated. Matches package version 2.0.1. |
| June 4, 2018 | Documentation updated. Matches package version 2.0.0. |
| May 25, 2018 | Documentation updated. Matches package version 1.9.9. |
| May 4, 2018 | Documentation updated. Matches package version 1.9.8. |
| March 19, 2018 | Documentation updated. Matches package version 1.9.0. |
| Feb 8, 2018 | Documentation updated. Matches package version 1.7.0. |
| Feb 6, 2018 | Documentation cleaned up. Matches package version 1.6.1. |
| Jan 31, 2018 | Documentation updated (developmental review) |
| Jan 29, 2018 | Document updated. Matches package version 1.6.0. |
| Jan 18, 2018 | Document updated. Matches package version 1.5.1. |
| Jan 17, 2018 | Document updated. Matches package version 1.5.0. |
| Jan 12, 2018 | Document updated. Matches package version 1.4.0. |
| Nov 7, 2017 | Document created. Matches package version 1.0.0. |